The Ultimate Fruit and Cheese Board: Your Ticket to Snacking Nirvana!
Okay, besties, listen up! If you’re not already obsessed with cheese boards, prepare to have your mind blown. Seriously, a cheese board isn’t just food; it’s a vibe. It’s a whole mood. And trust me, this fruit and cheese board? It’s about to be your new go-to for everything from girls’ nights to, like, a Tuesday. I’m Dora, and I’m about to drop some serious knowledge on how to create a cheese board that’s not only delicious but also totally Instagrammable. Are you ready to become a cheese board pro? Let’s do this!
Why You’ll Literally Obsess Over This Fruit and Cheese Board
Why is this cheese board the ultimate game-changer? Let me break it down for you:
- **Effortless Elegance**: It looks fancy AF, but it’s secretly so easy to throw together.
- **Crowd-Pleaser**: Seriously, who doesn’t love cheese and fruit? It’s a universal language of deliciousness.
- **Customizable**: You can totally make it your own with your favorite cheeses, fruits, and extras.
- **Perfect for Any Occasion**: From casual hangouts to fancy parties, this board is always a hit.
- **It’s a Vibe**: Let’s be real. The *aesthetic* is on point. This board is practically begging to be Instagrammed.
Decoding the Deliciousness: Ingredients You’ll Need
Alright, let’s talk ingredients. This is where you get to let your personality shine! But here’s a starting point to get you going:
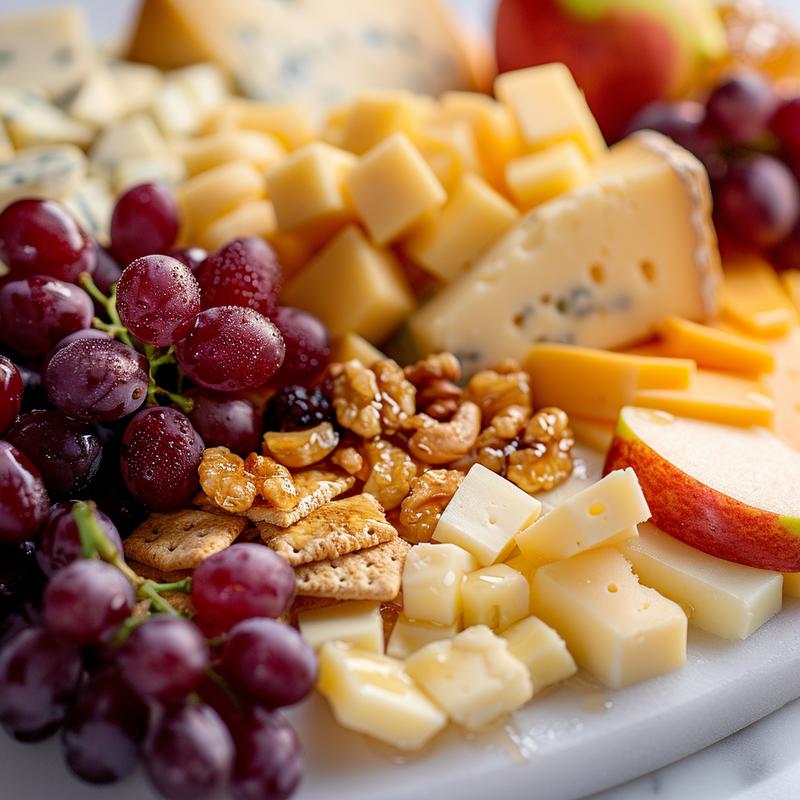
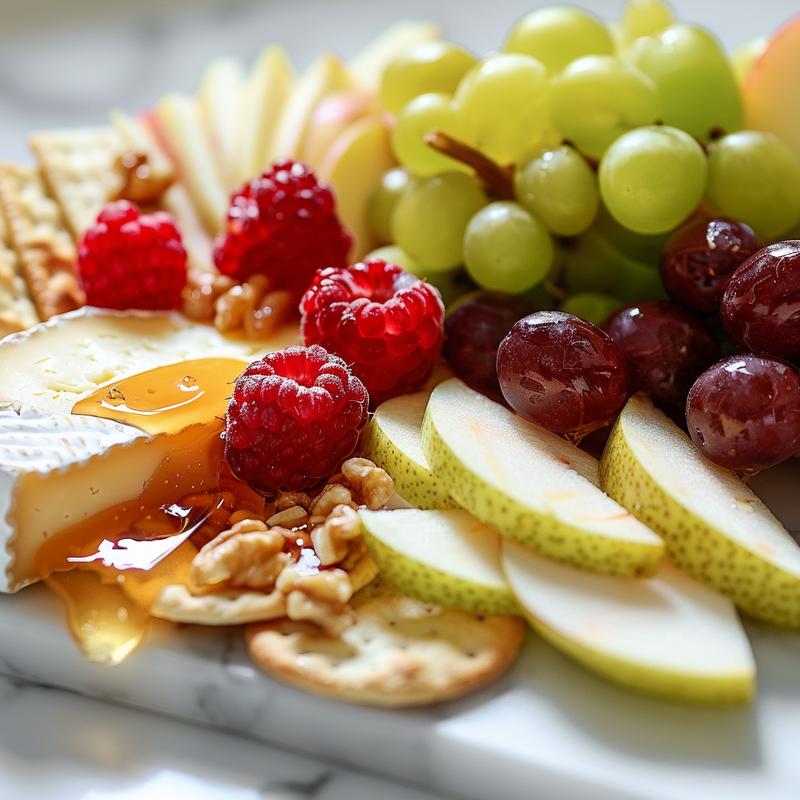
- **Assorted Cheeses**: Think a mix of textures and flavors. Brie (the creamy queen!), cheddar (a classic for a reason), and gouda (sweet and nutty) are always solid choices.
- **Fresh Fruits**: Grapes (red and green for that pop of color!), berries (strawberries, blueberries, raspberries – the more, the merrier!), apple slices (Granny Smith for that tartness!), and pear slices (Anjou or Bosc are 👌).
- **Crackers or Baguette Slices**: Gotta have something to pile that cheesy goodness onto! A mix of plain and flavored crackers adds some fun.
- **Optional: Honey or Jam**: A drizzle of honey or a dollop of fig jam takes this board to the next level. Trust me on this one.
- **Optional: Nuts**: Walnuts, almonds, or pecans add a satisfying crunch and a touch of sophistication.
Remember, this is your canvas! Don’t be afraid to experiment and find your faves. **It’s** all about what YOU love.
Step-by-Step: Your Foolproof Guide to Cheese Board Glory
Okay, here’s the super-easy breakdown of how to assemble your masterpiece. **It’s** so simple, you’ll be making these on repeat!
- **Select a Serving Board or Platter**: Go big or go home! A large wooden board is classic, but a marble platter or even a pretty serving tray works too. The **platter is** your stage, so make it a good one.
- **Arrange Cheeses on the Board, Spacing Them Apart**: Think about creating visual interest. Place the brie in one corner, the cheddar in another, and the gouda somewhere in between. **Your cheese** placement is key!
- **Fill in the Gaps with Fresh Fruits**: This is where you get to play with color and texture. Scatter the grapes around, arrange the berries in little clusters, and fan out the apple and pear slices. Think of it like edible art!
- **Place Crackers or Baguette Slices Around the Cheeses and Fruits**: Make sure there are plenty of crackers within easy reach. You want people to be able to grab and go.
- **Add Small Bowls of Honey or Jam, if Desired**: These little extras add a touch of sweetness and sophistication. Plus, they look super cute!
- **Sprinkle Nuts Around the Board, if Desired**: A sprinkle of nuts adds a satisfying crunch and a touch of visual interest.
- **Serve Immediately and Enjoy!**: The most important step! Get ready for the compliments to roll in.
Pro Tips for Cheese Board Perfection
Want to take your cheese board game to the next level? Here are a few pro tips that will make you look like a total expert:
- **Temperature Matters**: Let your cheeses sit out at room temperature for about 30 minutes before serving. This will allow their flavors to fully develop.
- **Variety is Key**: Aim for a mix of textures and flavors. Soft cheeses, hard cheeses, mild cheeses, and pungent cheeses – the more variety, the better!
- **Don’t Be Afraid to Get Creative**: Add some unexpected elements, like olives, pickles, or even a few slices of prosciutto.
- **Think About Color**: Use colorful fruits and vegetables to create a visually appealing board.
- **Garnish Like a Pro**: A few sprigs of rosemary or thyme can add a touch of elegance.
**Here are** some extra things to keep in mind.
Common Cheese Board Mistakes (and How to Avoid Them!)
We all make mistakes, but luckily, cheese board mistakes are easily avoidable. Here’s what to watch out for:
- **Overcrowding the Board**: Less is more! Don’t try to cram too much onto your board. Give everything some breathing room.
- **Using Only One Type of Cheese**: Where’s the fun in that? Variety is the spice of life (and cheese boards!).
- **Forgetting the Crackers**: Seriously, this is a major faux pas. **A cheese** board without crackers is like a party without music.
- **Serving Cold Cheese**: As mentioned earlier, let your cheeses come to room temperature for the best flavor.
- **Not Thinking About Dietary Restrictions**: Make sure to have some gluten-free crackers or dairy-free options available for guests with dietary restrictions.
Cheese Board Variations: Remix Your Way to Deliciousness
The beauty of a cheese board is that it’s totally customizable. Here are a few variations to try:
- **Mediterranean Cheese Board**: Add olives, hummus, pita bread, and feta cheese for a taste of the Mediterranean.
- **Dessert Cheese Board**: Swap out the savory cheeses for sweet cheeses like mascarpone or ricotta, and add chocolate, cookies, and fruit preserves.
- **Holiday Cheese Board**: Use seasonal fruits and cheeses to create a festive board for the holidays. Cranberries, pomegranates, and gingerbread cookies would be perfect.
- **Breakfast Cheese Board**: Use mini bagels, cream cheese, smoked salmon, and avocado for a brunch-worthy spread.
**Your cheese board** is your canvas. **It’s** all about experimenting.
Storage Secrets: Keeping Your Cheese Board Fresh
So, you’ve made this amazing cheese board, but you have leftovers (gasp!). Here’s how to keep everything fresh:
- **Wrap Cheeses Tightly**: Use plastic wrap or beeswax wrap to prevent the cheeses from drying out.
- **Store Fruits Separately**: Fruits can make the cheeses soggy, so store them in a separate container.
- **Keep Crackers in an Airtight Container**: This will prevent them from going stale.
- **Refrigerate Properly**: Store the cheese board in the refrigerator until you’re ready to serve it again.
Frequently Asked Questions: Your Cheese Board Queries Answered
Got questions? I’ve got answers! Here are some frequently asked questions about cheese boards:
- **How much cheese do I need per person?**: Aim for about 2-3 ounces of cheese per person.
- **What’s the best way to cut cheese?**: It depends on the type of cheese. Soft cheeses are best cut with a cheese knife, while hard cheeses can be cut with a regular knife.
- **Can I make a cheese board ahead of time?**: Yes, you can assemble the cheese board a few hours in advance. Just wrap it tightly and store it in the refrigerator.
- **What kind of wine pairs well with a cheese board?**: It depends on the cheeses you’re serving. A crisp white wine like Sauvignon Blanc pairs well with most cheeses, while a red wine like Cabernet Sauvignon pairs well with stronger cheeses.
- **Where can I find inspiration for cheese board ideas?**: Pinterest and Instagram are great sources of inspiration! **Here’s a** hint: start with my page!
Serving Suggestions: The Art of Presentation
Okay, you’ve created this amazing cheese board. Now, it’s time to serve it! Here are a few tips for presentation:
- **Use Pretty Serving Dishes**: Small bowls for honey or jam, and cute little spoons for serving.
- **Add a Few Garnishes**: Sprigs of rosemary, thyme, or edible flowers can add a touch of elegance.
- **Arrange Everything Artistically**: Think about color, texture, and balance when arranging the cheeses, fruits, and crackers.
- **Provide Cheese Knives**: Make sure your guests have the right tools for the job.
- **Most Importantly: Enjoy!**: A cheese **platter is** meant to be enjoyed! Gather your friends, pour some wine, and dig in!
Seriously, making **a simple** cheese and **fruit board** is the **hack** that will make you the hostess with the mostest. I can’t wait to see what you create! Don’t forget to tag me in your pics! And if you want even more amazing recipes and tips, be sure to subscribe to **your email** list! Let’s get cheesy, besties!

Cheese Board with Fruits
Ingredients
Method
- Select a serving board or platter.
- Arrange cheeses on the board, spacing them apart.
- Fill in the gaps with fresh fruits.
- Place crackers or baguette slices around the cheeses and fruits.
- Add small bowls of honey or jam, if desired.
- Sprinkle nuts around the board, if desired.
- Serve immediately and enjoy!
Notes
Loved this recipe? Save it to your favorite Pinterest board so you can easily find it later! ✨