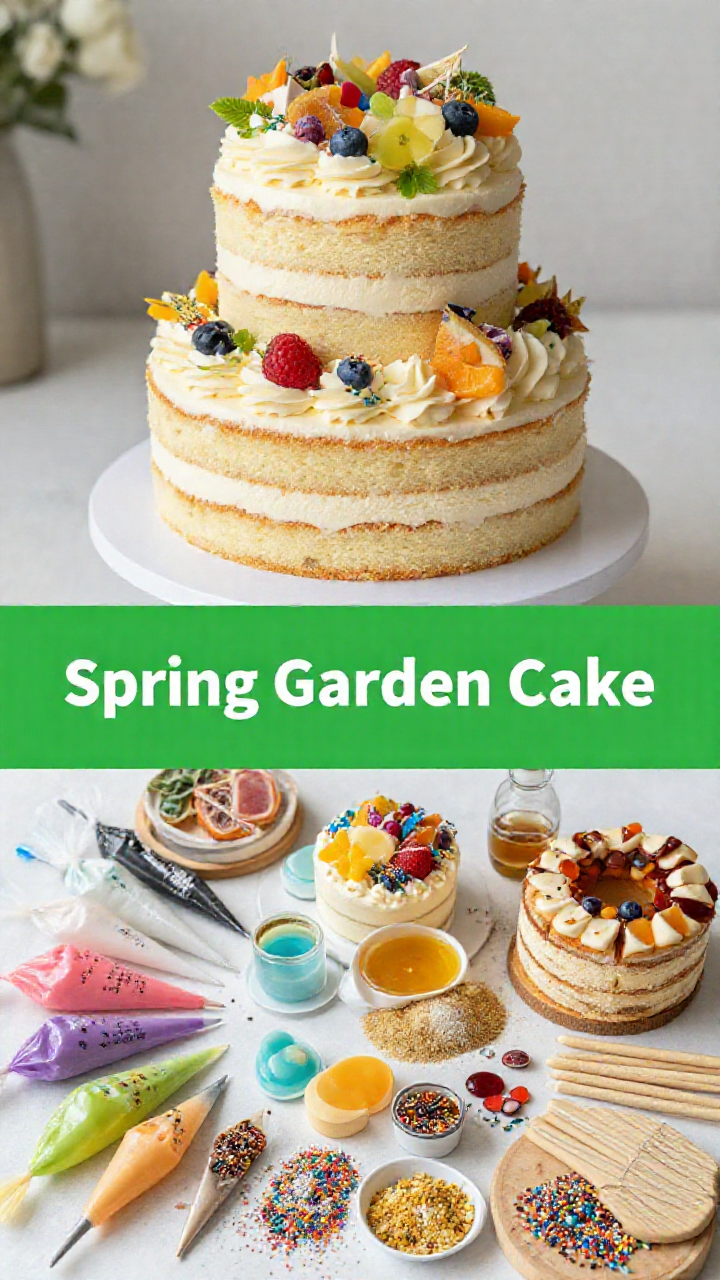
Spring Garden Cake: A Buttercream Dream
Welcome, darlings, to a slice of springtime elegance! This Spring Garden Cake is more than just dessert; it’s an edible expression of joy, perfect for birthdays, celebrations, or simply elevating a Tuesday night. Think of it as bringing the charm of a blooming garden straight to your table. It’s utterly chic, surprisingly simple, and guaranteed to impress. Let’s embark on this delightful baking journey!
Why You’ll Love This Cake
This isn’t your average cake recipe. It’s about creating an experience, a centerpiece that sparks conversation and delight. Here’s why this cake will become your go-to for special occasions:
- Effortless Elegance: High-impact design with minimal fuss.
- Customizable Charm: Adaptable to your favorite garden elements.
- Deliciously Delightful: Vanilla cake and buttercream—a timeless combination.
- Impressive Presentation: Stacked tiers and fondant decorations create a stunning visual.
Ingredients: Your Palette of Flavors
Quality ingredients are the cornerstone of any masterpiece. Here’s what you’ll need to create your Spring Garden Cake:
- 6-inch and 8-inch vanilla cake layers: The foundation of our garden.
- Buttercream frosting: Our silky smooth canvas.
- Fondant: For sculpting our garden’s flora and fauna.
- Gel food coloring: To bring vibrant hues to our decorations.
- Edible glue: To keep our garden elements in place.
- Piping bags and tips: For adding delicate details.
- Sprinkles (optional): For a touch of whimsy.
- Luster dust (optional): For a subtle shimmer.
- Cake boards (6-inch and 8-inch): Sturdy foundations for each tier.
- Cake dowels or supports: Ensuring structural integrity.
- Simple Syrup (optional): For added moisture.
Crafting Your Spring Garden Cake: Step-by-Step
Here’s a streamlined guide to bringing your Spring Garden Cake to life:
- Bake & Hydrate: Bake your 6-inch and 8-inch vanilla cake layers. Once cooled, optionally brush with simple syrup for extra moisture.
- Level Up: Using a cake leveler or serrated knife, ensure your cake layers are perfectly level.
- Buttercream Bliss: Prepare your buttercream frosting. Well mixed buttercream is key for a smooth finish.
- Tinted ‘Turf’: Reserve a portion of the buttercream and tint it green for the ‘grass’.
- Board Prep: Place the 8-inch cake layer on an 8-inch cake board and the 6-inch cake layer on a 6-inch cake board. Use a dollop of buttercream to secure each layer to its board.
- Crumb Coat Magic: Crumb coat each cake layer with buttercream and chill for 30 minutes. This seals in crumbs and creates a pristine surface.
- Final Frosting: Frost each cake layer with a final, smooth layer of buttercream.
- Structural Support: Insert cake dowels into the 8-inch cake to support the 6-inch cake. Trim the dowels to be level with the cake’s surface.
- Stacking Time: Carefully stack the 6-inch cake on top of the 8-inch cake.
- Grass Roots: Decorate around the base of both cakes with green buttercream, creating a ‘grass’ effect.
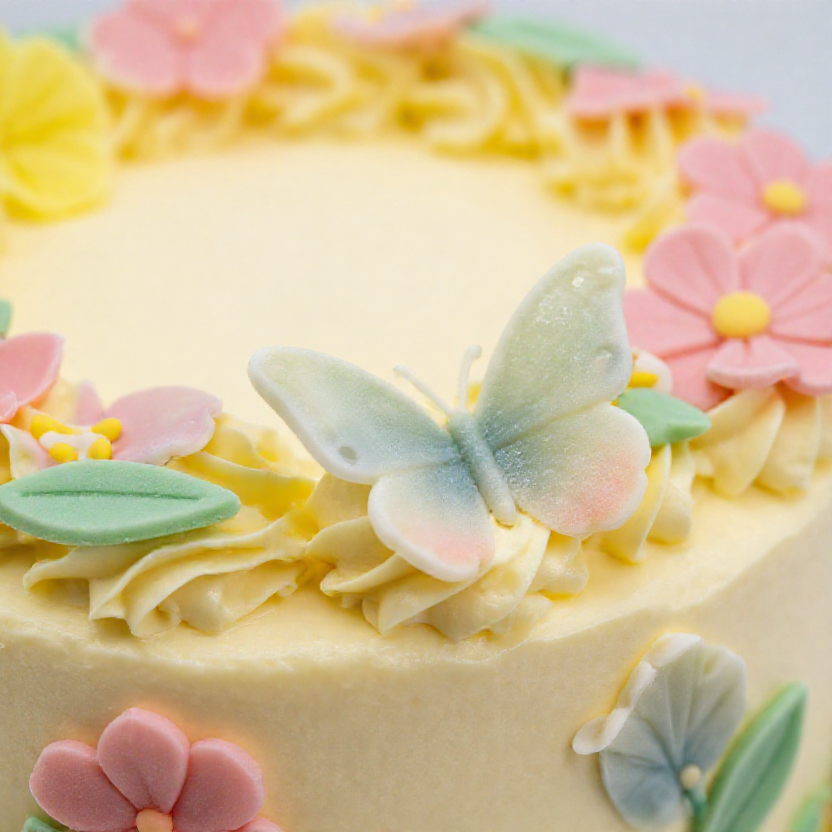
- Fondant Fantasy: Roll out your fondant and use cookie cutters or molds to make flowers, butterflies, ladybugs, mushrooms, or other garden-themed elements.
- Color Palette: Tint the fondant with food color as desired.
- Adhesive Art: Attach your fondant decorations on top of the cake using edible glue.
- Piping Perfection: Add additional buttercream details like vines, leaves, or flower centers using piping bags and tips.
- Finishing Touches: Add sprinkles or luster dust for extra shimmer (optional).
- Chill Out: Chill the assembled cake for at least 30 minutes or until ready to serve.
Pro Tips for a Picture-Perfect Cake
- Cake Prep is Key: Leveling the cake layers ensures a stable and visually appealing final product.
- Chill Time: Chilling the cake after the crumb coat and final frosting helps set the buttercream, making it easier to handle.
- Fondant Finesse: Work with fondant on a non-stick surface to prevent it from sticking. Keep unused fondant wrapped in plastic food wrap or in plastic bag to prevent drying out.
- Color Confidence: Add gel food coloring gradually to achieve your desired shade.
- Edible Glue Wisdom: Use edible glue sparingly to avoid a sticky mess.
Common Mistakes (and How to Avoid Them)
- Dry Cake: Avoid overbaking. Using a cake tester is crucial.
- Lopsided Layers: Inaccurate leveling can lead to instability. A cake leveler is your best friend.
- Melting Buttercream: Ensure the cake layers are completely cool before frosting.
- Cracked Fondant: Knead fondant well to ensure it’s pliable.
- Unstable Structure: Insufficient dowels can cause the cake to collapse.
Variations: Let Your Creativity Bloom
- Flavor Fusion: Experiment with different cake flavors like lemon, almond, or chocolate.
- Floral Focus: Create a cake entirely dedicated to edible flowers.
- Themed Gardens: Consider a fairy garden theme or a specific type of garden, like a rose garden.
- Buttercream Art: Use various piping techniques to create intricate buttercream designs.
- Cookie Crumb Creations: Press cookie crumbs around the base for a textured effect.
Storing Your Masterpiece
To keep your Spring Garden Cake fresh and delicious:
- Room Temperature: Store in an airtight container for up to 2 days.
- Refrigeration: For longer storage, refrigerate for up to 5 days. Let it come to room temperature before serving.
- Freezing: Freeze individual slices for up to 2 months. Thaw in the refrigerator overnight.
Frequently Asked Questions
- Can I make this cake ahead of time? Yes! Bake the cake layers and make the buttercream frosting 1-2 days in advance. Store them separately until ready to assemble. The fondant decorations can be made several days in advance and set aside until ready to use, wrapped in plastic.
- What’s the best way to transport this cake? Use a sturdy cake box and place into the box carefully. Secure the box on a flat surface in your car.
- Can I use store-bought cake mix and frosting? Absolutely! While homemade is always delightful, store-bought options can save time.
- How do I prevent the cake from drying out? Brushing the cake layers with simple syrup adds moisture and flavor.
- What kind of fondant should I use? Rolled fondant is ideal for creating decorations.
Serving Suggestions: A Celebration for the Senses
Serving this cake is an event in itself. Pair it with:
- Floral Tea: Complement the garden theme with a delicate floral tea.
- Sparkling Wine: Add a touch of elegance with a glass of bubbly.
- Fresh Berries: Serve alongside a bowl of fresh, seasonal berries.
- Vanilla Bean Ice Cream: A classic pairing that enhances the cake’s flavor.
- A Beautiful Setting: Display the cake on a lovely cake stand surrounded by fresh flowers.
Elevate Your Everyday
There you have it—a stunning Spring Garden Cake that’s as delightful to make as it is to devour. Remember, the key is to enjoy the process and let your creativity shine. Happy baking, darlings! I do hope you enjoyed my top of cake tips.
For more inspiration, check out these related creations:

Spring Garden Themed Cake
Ingredients
Method
- Bake and cool cake layers. Brush with simple syrup if desired.
- Level the cake layers.
- Prepare buttercream frosting.
- Tint buttercream green for 'grass'.
- Place cake layers on cake boards with buttercream dollop.
- Frost each cake layer with buttercream. Crumb coat and chill for 30 minutes.
- Frost each cake layer with a final layer of buttercream. Smooth the buttercream.
- Insert cake dowels into the 8-inch cake. Cut dowels level with the cake.
- Carefully stack the 6-inch cake on top of the 8-inch cake.
- Decorate with green buttercream around the base to create a 'grass' effect.
- Prepare fondant decorations using cookie cutters or molds.
- Tint fondant with gel food coloring as needed.
- Attach fondant decorations to the cake using edible glue.
- Pipe additional buttercream details.
- Add sprinkles or luster dust for extra decoration (optional).
- Chill the assembled cake for at least 30 minutes before serving.
Notes