
Hey besties! Dora here, and OMG, Thanksgiving is, like, *literally* around the corner! And you know what that means? It’s time to ditch the same old boring appetizers and level up your holiday game with the most epic Thanksgiving cheese board EVER. I’m talking a total feast for the eyes *and* the taste buds. Get ready to wow your guests because this is about to be a total game-changer!
This isn’t just a cheese board; it’s an experience. It’s a vibe. It’s the kind of spread that will have everyone reaching for their phones to snap a pic before they even take a bite. Trust me, you’re going to be obsessed.
Why You’ll Love This Thanksgiving Cheese Board
Okay, so why is this Thanksgiving charcuterie board the *ultimate*? Let me break it down for you:
- Visually Stunning: It’s not just about the taste; it’s about the presentation. This board is a work of art.
- Easy to Customize: You can totally tailor it to your guests’ preferences. Gluten-free? Vegan? No problem!
- Stress-Free Appetizer: No cooking required! Just arrange and enjoy. It’s the perfect way to keep your guests happy while you’re busy prepping the main course.
- The Ultimate Conversation Starter: This board is guaranteed to get everyone talking and mingling.
Seriously, *if you* want to impress your friends and family this Thanksgiving, this cheese board is the answer. *If you* are looking for a simple Thanksgiving charcuterie, this is the perfect board.
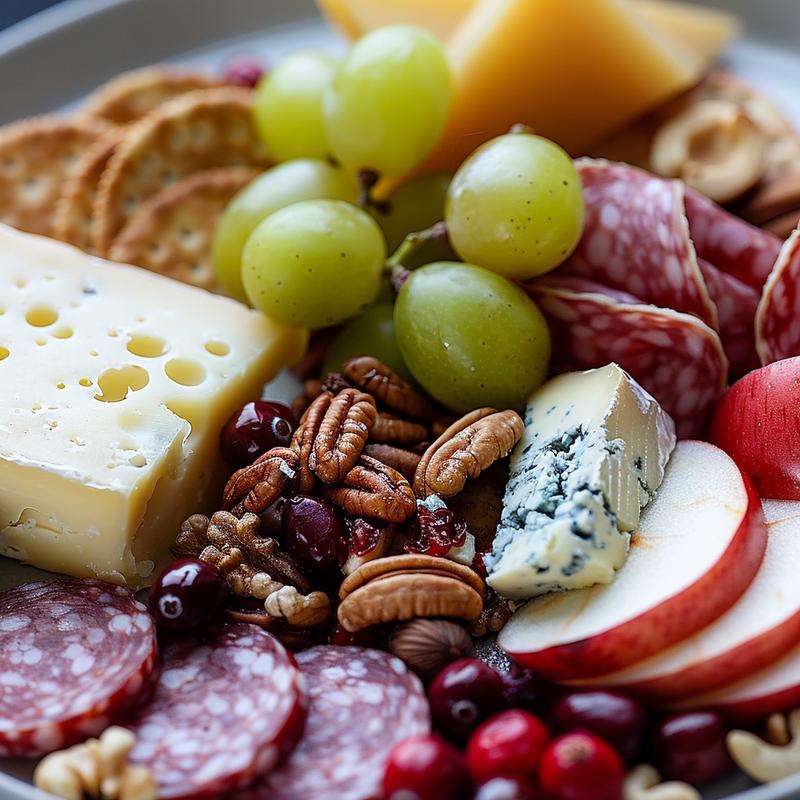
Thanksgiving Cheese Board Ingredients: The Dream Team
Alright, let’s talk ingredients! This is where you can really get creative, but here’s my go-to list of essentials:
- Selection of Cheeses: Brie (for that melty goodness), Cheddar (a classic!), Goat Cheese (tangy and delish), Blue Cheese (for the adventurous!). *If you* want to add more, go for it!
- Cured Meats: Prosciutto, salami, chorizo – the possibilities are endless. Think about different textures and flavors. I love a good cured beef.
- Crackers: Variety is key! I always include water crackers, some multigrain crackers, and maybe even some cranberry crostini for a festive touch.
- Fruit: Grapes (red and green!), apples (Honeycrisp are my fave), pears (Bosc are perfect for fall), and dried cranberries for a pop of sweetness.
- Nuts: Walnuts, pecans, almonds – a crunchy contrast to the creamy cheeses.
- Spreads: Fig jam (so sophisticated!), honey (a classic pairing with cheese), apple butter, and cranberry sauce (duh!).
- Fresh Herbs: Rosemary and thyme – not just for flavor, but for that extra touch of visual appeal.
- Optional: Pickled Vegetables: Cornichons and marinated olives add a salty, tangy kick.
*We used* all of these on *the board*, and it was a total hit! *The exact* cheeses *we used* were a brie, a sharp cheddar, a creamy goat cheese, and a funky blue cheese. This cheese plate is sure to be a crowd-pleaser.
How to Build the Ultimate Thanksgiving Charcuterie Board: Step-by-Step
Okay, here’s the fun part! Let’s build this masterpiece:
- Choose Your Board: Grab a large serving board or platter. A wooden board is always a classic, but you can also use a slate board or even a large serving tray. *The board* should be big enough to hold everything comfortably.
- Arrange the Cheeses: Place the cheeses in different areas of *the board*, leaving space between them. Think about varying the shapes and sizes.
- Add the Cured Meats: Arrange the cured meats in small piles or folded ribbons. Get creative with how you display them!
- Place the Crackers: Scatter the crackers around the cheeses and meats, varying shapes and flavors. *Water crackers* are always a safe bet.
- Fill in the Gaps: This is where the fruit, nuts, and pickled vegetables come in! Fill in any empty spaces to create a visually appealing and abundant board.
- Spoon the Spreads: Spoon the spreads into small bowls and place them strategically on *the board*.
- Garnish with Herbs: Garnish with fresh herbs for that final touch of elegance.
- Serve Immediately (or Chill): You can serve the board immediately, or chill it for later. Just make sure to bring it to room temperature before serving for the best flavor.
Boom! You’ve got yourself a Thanksgiving cheese board that’s Instagram-worthy and totally delicious. *To make* it even easier, you can prep some of the ingredients ahead of time.
Pro Tips for a Next-Level Cheese Board
Want to take your cheese board to the next level? Here are a few pro tips:
- Cheese Placement: Place the softest cheeses toward the center of the board to prevent them from spreading too much.
- Meat Folding Techniques: Fold salami into quarters or create ribbons with prosciutto for a more elegant presentation.
- Garnish Game Strong: Use edible flowers or colorful fruits to add pops of color.
- Temperature Matters: Let your cheeses come to room temperature for about 30 minutes before serving for the best flavor.
*If you* follow these tips, *your guests* will be blown away!
Common Mistakes to Avoid
Even the best of us make mistakes! Here are a few common pitfalls to avoid when creating your Thanksgiving cheese board:
- Overcrowding: Don’t try to cram too much onto the board. Leave some breathing room for each item.
- Ignoring Dietary Restrictions: Always be mindful of your guests’ dietary restrictions. Offer gluten-free crackers or vegan cheese options if needed.
- Not Prepping Ahead: Don’t wait until the last minute to start building your board. Prep as much as you can in advance.
- Forgetting the Knives: Provide separate knives or spoons for each cheese and spread to prevent cross-contamination.
*They’re* easy to fix, so don’t sweat it!
Thanksgiving Cheese Board Variations: Remix It!
Want to put your own spin on this classic? Here are a few variations to try:
- Vegan Cheese Board: Use plant-based cheeses, vegan crackers, and plenty of fruits, nuts, and vegetables.
- Gluten-Free Cheese Board: Choose gluten-free crackers and focus on naturally gluten-free cheeses like cheddar and goat cheese.
- Kid-Friendly Cheese Board: Include milder cheeses, kid-friendly fruits and vegetables, and fun snacks like pretzels and popcorn.
- Dessert Cheese Board: Swap out the savory elements for sweet treats like chocolate, cookies, and fruit tarts.
*You can* easily adapt *this cheese* board to suit any occasion.
How to Store Leftovers
Okay, so you’ve got some leftovers (if you’re lucky!). Here’s how to store them properly:
- Wrap the Cheese: Wrap each cheese individually in plastic wrap or beeswax wrap to prevent it from drying out.
- Store the Meats: Store the cured meats in an airtight container in the refrigerator.
- Keep Crackers Separate: Store the crackers in an airtight container at room temperature to prevent them from getting stale.
- Discard Spoiled Items: If any of the items on the board look or smell off, discard them immediately.
Thanksgiving Cheese Board FAQs
Got questions? I’ve got answers!
- What kind of cheese should I use?: Choose a variety of cheeses with different textures and flavors. I recommend including a soft cheese, a hard cheese, a crumbly cheese, and a blue cheese.
- How much cheese should I buy?: A good rule of thumb is to buy about 2-3 ounces of cheese per person.
- Can I make the board ahead of time?: Yes, you can assemble the board a few hours ahead of time. Just wrap it tightly in plastic wrap and store it in the refrigerator.
- What should I serve with the cheese board?: A variety of wines, beers, or non-alcoholic beverages. *A great* pairing with *this cheese* board would be *a few* glasses of wine.
Serving Suggestions: The Final Flourish
Okay, you’ve built the perfect Thanksgiving cheese board. Now, let’s talk serving suggestions:
- Presentation is Key: Arrange the board on a beautiful serving platter or wooden board.
- Provide Serving Utensils: Make sure to provide separate knives or spoons for each cheese and spread.
- Label the Cheeses: Label each cheese so your guests know what they’re eating.
- Offer a Variety of Drinks: Pair the cheese board with a selection of wines, beers, or non-alcoholic beverages.
There you have it! *It’s* *easy to* make and *you’re* sure to impress! *This board* is *a great* way *for thanksgiving* *as a* easy appetizer. With a little creativity and these tips, you can create a Thanksgiving cheese board that will be the star of your holiday gathering. Happy Thanksgiving, besties! XOXO!

Thanksgiving Cheese Board
Ingredients
Method
- Choose a large serving board or platter.
- Arrange cheeses in different areas of the board.
- Add cured meats in small piles or folded ribbons.
- Place crackers around the cheeses and meats.
- Fill in the gaps with fruit, nuts, and pickled vegetables.
- Spoon spreads into small bowls and place them on the board.
- Garnish with fresh herbs for visual appeal.
- Serve immediately or chill for later.
Notes
Loved this recipe? Save it to your favorite Pinterest board so you can easily find it later! ✨
