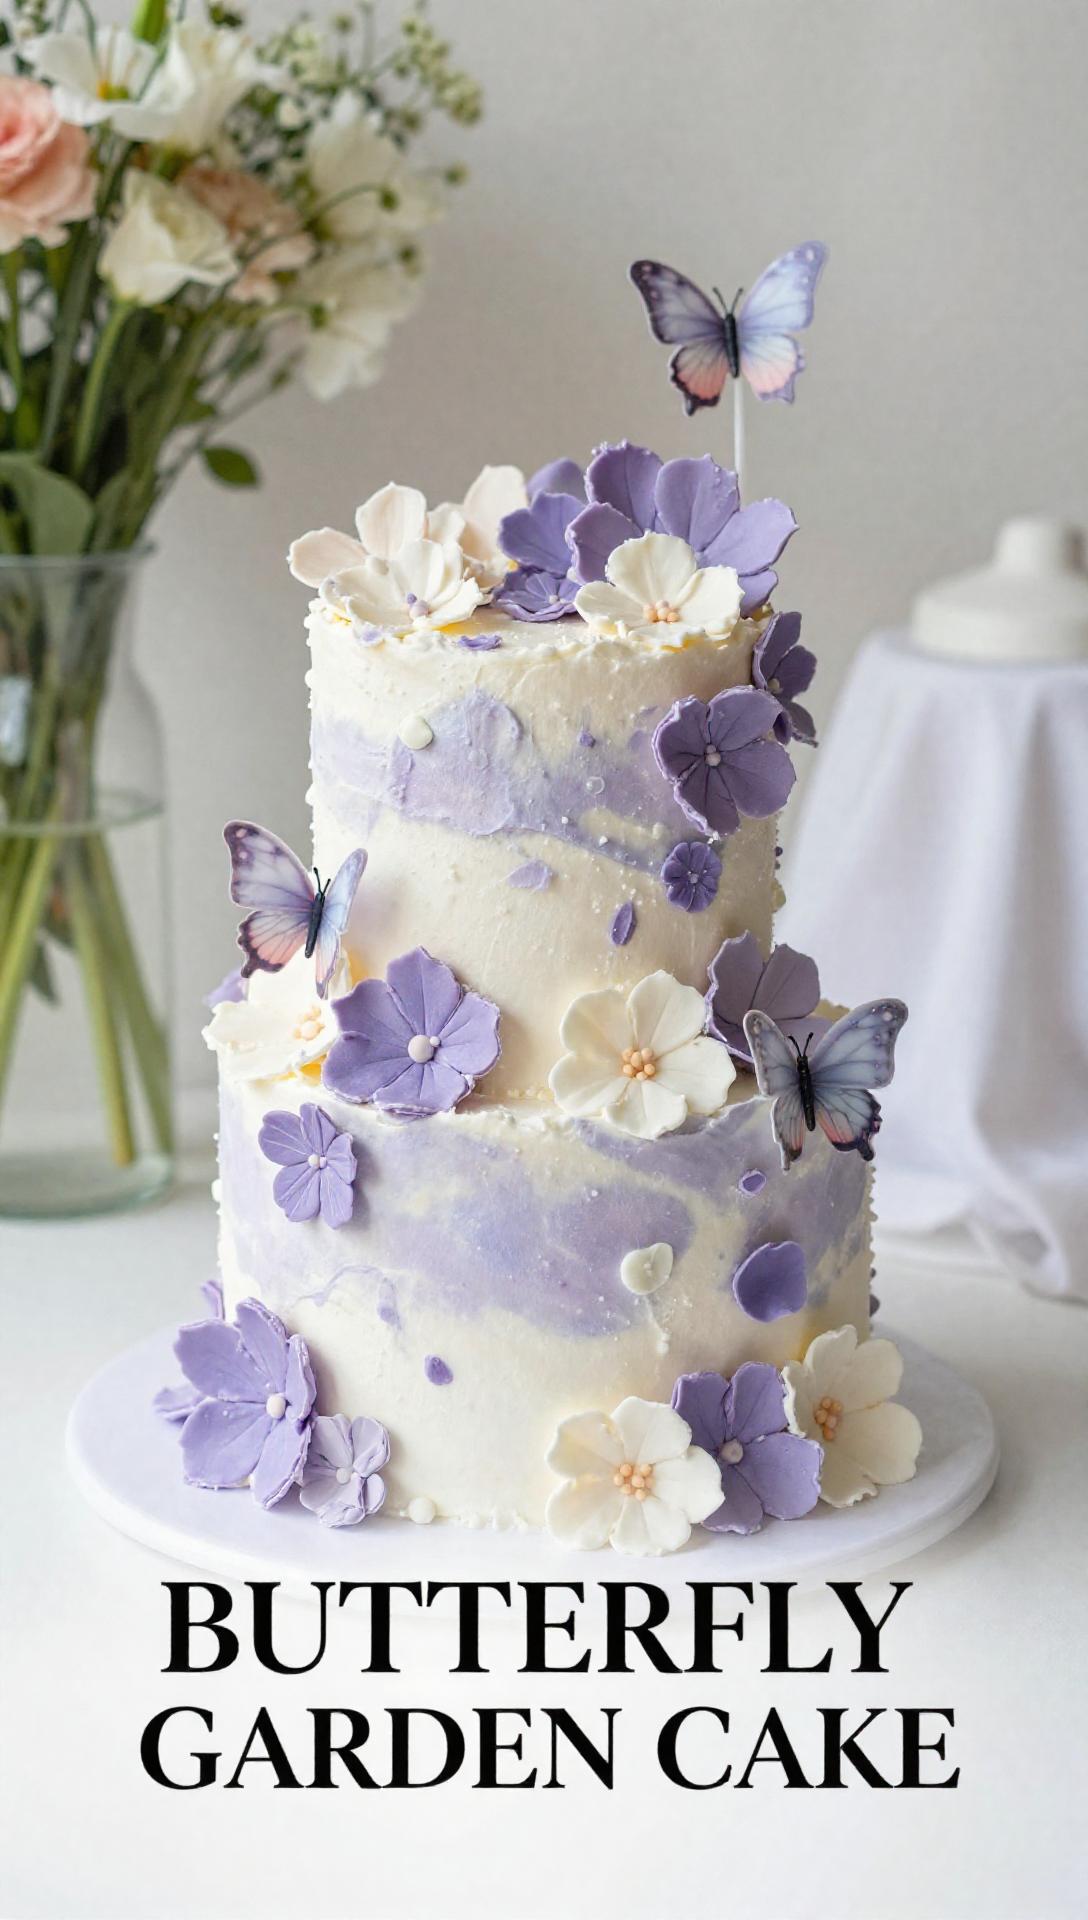
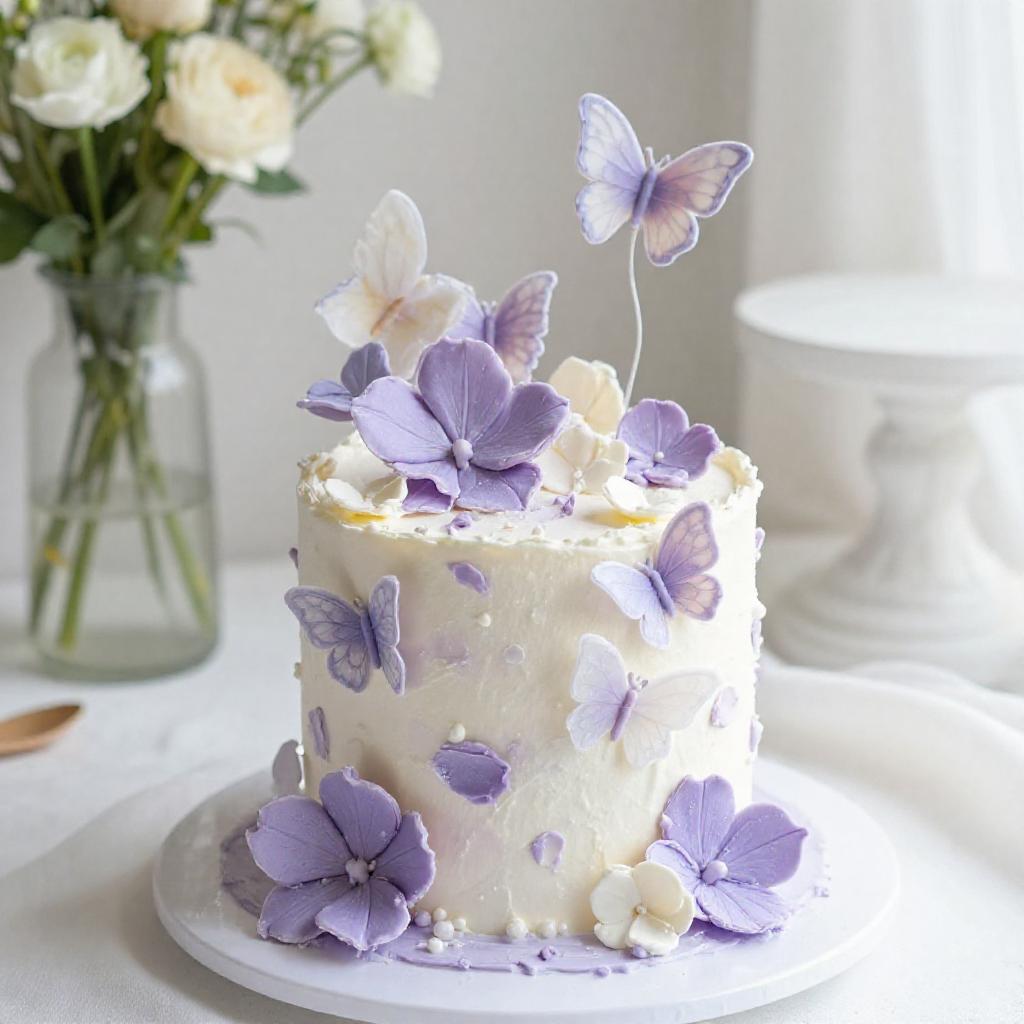
Whimsical Garden Cake: Elevating Your Spring Celebrations
As a former art gallery director, my life has always been about curating beauty and finding elegance in simplicity. This philosophy extends effortlessly into my kitchen, especially when it comes to entertaining. Forget the fuss; sophisticated hosting should be a pleasure, not a project. Today, we delve into creating a Whimsical Garden Cake – a design that embodies high-impact charm with remarkably low effort. It’s a celebration of spring, a delicate balance of vibrant colors and refined textures, perfect for a chic gathering or simply to elevate an everyday moment. This isn’t about intricate patisserie; it’s about artful assembly, transforming simple ingredients into a breathtaking centerpiece that feels both luxurious and approachable. Let’s demystify the art of decorating and craft something truly memorable.
Why You’ll Adore This Whimsical Garden Cake
- Effortlessly Elegant: This design proves that ‘less is more’ can still be utterly captivating. The techniques are streamlined, ensuring a polished result without requiring hours of intricate work.
- Visually Stunning: The vibrant colors and delicate details create a truly picturesque cake, perfect for a Spring Cake, Birthday Cake Butterfly theme, or a Fairy First Birthday Cake. It’s a centerpiece that sparks conversation.
- Customizable Charm: While we provide a guide, the beauty lies in its adaptability. You can tailor the colors and garden elements to suit any occasion, making each creation uniquely yours.
- Stress-Free Hosting: My mission is to make entertaining feel calm and capable. This cake design, with its forgiving nature and straightforward steps, allows you to enjoy the process and your guests, rather than being tethered to the kitchen.
- Master Essential Techniques: You’ll gain confidence in fundamental Buttercream Cake Decorating and Cake Decorating Frosting skills, making future baking projects even more accessible.
Ingredients for Your Garden Masterpiece
- Prepared cake layers (vanilla or your choice): The foundation of your creation.
- Buttercream frosting (various colors: green, pink, purple, yellow, white): The vibrant canvas for your garden.
- Fondant (various colors for flowers, mushrooms, etc.): For sculptural, lasting details.
- Edible glitter or shimmer dust: To add a touch of magic and sparkle.
- Edible glue: Essential for securing delicate fondant elements.
- Piping bags and tips (round, leaf, petal): Your tools for intricate buttercream work.
- Lollipop sticks or toothpicks (for supporting fondant decorations): For structural integrity of taller elements.
- Edible moss or green sprinkles: To create a realistic, textured ground cover.
- Chocolate shavings (for soil effect): Adds depth and a rustic touch.
- Optional: Edible pearls, candies, or other decorations: For personalized accents and extra whimsy.
Pro Tips for a Flawless Finish
Creating a truly elegant cake is about precision and the right tools. Here, I share my curated insights to ensure your Whimsical Garden Cake is nothing short of perfection.
- Cake Preparation is Key: Before you even think about cake icing, ensure your cake layers are perfectly level and completely cooled. A level cake is the secret to a stable, professional-looking finish. Use a serrated knife or a cake leveler for uniform layers. Once leveled, fill between layers with a generous, even spread of buttercream.
- The Crumb Coat – Your Best Friend: This thin, initial layer of buttercream locks in any loose crumbs, creating a smooth canvas for your final frosting. Apply it thinly, chill the cake for 15-20 minutes until firm, then proceed. This step is non-negotiable for a pristine surface.
- Mastering the Frosting Application: For the main green layer of buttercream, which will serve as your ‘grass,’ apply a generous amount to the top and sides of the cake. This is where your icing spatula becomes indispensable. A good cake icing spatula, especially one from a quality spatula set, will make all the difference. I find that a flexible metal blade combined with a comfortable wooden handle that doesn’t tire your grip makes the process significantly smoother. It truly is easier to put icing on your homemade cakes when you have the right ergonomic design.
- Smooth Operator: To achieve that coveted smooth finish, use a long, straight icing spatula or a bench scraper. For the top, hold the spatula flat and rotate the cake. For the sides, hold the scraper perpendicular to the cake and rotate the turntable. A little warmth on your spatula (dipped in hot water and wiped dry) can help achieve an even glossier finish.
- Fondant Finesse: When working with fondant, roll it thinly and evenly on a surface dusted with cornstarch or powdered sugar to prevent sticking. Use sharp cutters for clean edges. For delicate elements like Butterfly Cake wings or tiny flowers, allow them to air dry for a few minutes before handling to help them firm up. For more intricate designs or if your package include a variety of tools, consider using silicone molds for consistent shapes.
- Piping with Precision: Fill your piping bags no more than two-thirds full to prevent overflow. Practice your piping techniques on a piece of parchment paper before applying them to the cake. For delicate leaf details or small buttercream flowers, consistent pressure is key. Remember, building up your cake icing skills means embracing practice.
- Strategic Placement: Before permanently attaching your fondant creations, arrange them loosely on the cake to visualize the final design. This allows you to adjust and refine your Butterfly Garden Cake layout before committing with edible glue. Consider creating varying heights and depths for a more dynamic scene.
- The Magic of Edible Glitter: A light dusting of edible glitter or shimmer dust can transform your garden elements, giving them a magical, dew-kissed appearance. Apply it with a soft brush once the fondant is dry.
- Let It Set: Once all decorations are in place, allow the cake to set it in the refrigerator for at least 30 minutes. This firms up the buttercream and stabilizes your fondant elements, ensuring everything stays perfectly in place until serving. This is especially important for homemade cakes that often travel.
Common Mistakes to Avoid
Even the most seasoned hosts encounter small challenges. Here’s how to gracefully sidestep common pitfalls when creating your garden cake.
- Rushing the Crumb Coat: Skipping or rushing this step is the most common error. Without it, you’ll have crumbs in your final frosting layer, detracting from the pristine finish. Patience here pays dividends.
- Overworking Fondant: Handling fondant too much can make it warm, sticky, and difficult to work with. Roll it out efficiently and avoid excessive re-rolling. Keep unused portions tightly wrapped.
- Too Much Edible Glue: A little goes a long way. Excessive edible glue can leave visible marks or make your fondant soggy. Apply sparingly with a fine brush or toothpick.
- Warm Buttercream: If your buttercream is too warm, it will be soft and difficult to pipe or smooth. If it starts to soften during decorating, pop it into the fridge for 10-15 minutes to firm up slightly.
- Ignoring Tool Quality: Trying to achieve a smooth finish with a flimsy icing spatula or an incomplete icing spatula set can be frustrating. Investing in a quality spatula set, particularly one that include cake decorating essentials, truly makes the process easier to put icing on your homemade cakes. A comfortable wooden handle that offers good grip is not just a luxury, but a practical advantage.
- Overcrowding the Design: While a whimsical garden implies abundance, resist the urge to add too many elements. Allow some negative space for your beautiful decorations to truly shine. Curate your garden, don’t clutter it.
Variations for Every Occasion
The beauty of this design is its inherent flexibility. Adapt it to your personal style or the specific event.
- Seasonal Blooms: Swap spring pastels for vibrant summer hues, rich autumnal tones, or frosty winter whites. Choose flowers that reflect the season.
- Monochromatic Elegance: Instead of a rainbow, choose a sophisticated palette of varying shades of one color (e.g., all whites and creams with subtle shimmer for a wedding, or blues for a serene winter scene).
- Thematic Gardens: Create a specific theme. A ‘berry patch’ cake with fondant berries and leaves, or a ‘mushroom forest’ with various fungi shapes. You can also craft a more specific Butterfly Shape Cake Design.
- Miniature Delights: Apply these techniques to Small Cupcakes for individual garden treats, perfect for a garden party or shower.
- Flavor Twists: While vanilla is a classic, consider a lemon cake for a zesty spring flavor, or a delicate almond cake to complement the floral notes. The techniques for cake icing remain the same.
Storage and Preservation
To ensure your elegant creation remains fresh and beautiful, proper storage is essential.
- Room Temperature (Short Term): If serving within 24 hours, and your environment is cool (under 70°F or 21°C), the cake can be stored at room temperature, loosely covered to prevent drying.
- Refrigeration (Longer Term): For longer storage, or in warmer climates, refrigerate the cake in an airtight cake carrier. Buttercream and fondant hold up well in the fridge.
- Bringing to Temperature: Always allow the cake to come to room temperature for at least 30-60 minutes before serving. This ensures the buttercream is soft and the cake is at its optimal flavor and texture.
- Fondant Care: Fondant can sometimes ‘sweat’ when moved from a cold refrigerator to a warm room due to condensation. If this happens, do not touch it. The moisture will typically evaporate on its own within 15-30 minutes.
Frequently Asked Questions
- Can I use store-bought cake layers and frosting?: Absolutely! This design is all about accessible elegance. Using quality store-bought components allows you to focus your energy on the decorating, making it easier to put icing on your homemade cakes (or semi-homemade!).
- How far in advance can I decorate this cake?: You can prepare fondant decorations several days in advance and store them in an airtight container at room temperature. The entire cake can be assembled and decorated 1-2 days before serving, storing it in the refrigerator.
- What if my buttercream is too stiff or too soft?: If too stiff, add a tiny bit of milk or cream (1/2 teaspoon at a time) and mix. If too soft, add a tablespoon of powdered sugar and mix, or chill it for 10-15 minutes. The consistency is crucial for smooth cake icing.
- Can I make this a gluten-free or dairy-free cake?: Yes, simply use your favorite gluten-free cake mix/recipe and dairy-free buttercream. The decorating techniques remain the same.
- Do I need a special icing spatula set?: While a basic icing spatula will work, a good spatula set that might include cake decorating tools like an offset spatula and a straight spatula will provide more versatility and control, making the application of cake icing much more precise. Look for one with a comfortable wooden handle that offers good grip.
- What if I don’t have all the piping tips?: You can achieve a lot with just a round tip for dots and lines, and a leaf tip for foliage. Don’t feel pressured to have an extensive collection; creativity often thrives with fewer tools.
Serving Your Whimsical Garden Cake
Presenting your cake is the final flourish, just as important as its creation. Choose a simple, elegant cake stand that allows your garden masterpiece to be the star. For a truly curated experience, pair slices with a delicate herbal tea or a crisp, dry rosé. The unfussy elegance of this cake means it pairs beautifully with minimalist plating – perhaps a single fresh mint leaf or a scattering of fresh berries. This isn’t just dessert; it’s an experience, a moment of cultivated joy. Each slice of your homemade cakes will reveal layers of flavor and the artistry of your personal touch. Enjoy the calm satisfaction of knowing you’ve created something truly special, effortlessly chic, and utterly delicious. It’s about making every occasion, no matter how small, feel like an intentional celebration.

How to Create a Whimsical Garden Cake: Mastering Cake Decorating Techniques for Spring C
Ingredients
Method
- Prepare the cake: Level and fill cake layers with buttercream. Crumb coat with buttercream.
- Frost the cake: Frost with green buttercream to represent grass. Smooth the frosting.
- Create fondant decorations: Roll out fondant and create garden elements. Use edible glue and glitter. Add lollipop sticks for support.
- Pipe buttercream details: Use piping bags to create buttercream flowers and vines.
- Arrange the garden: Arrange fondant and buttercream details on the cake. Secure with edible glue.
- Add finishing touches: Sprinkle edible moss around the base. Add chocolate shavings for soil. Add pearls or candies.
- Let the cake set: Allow the cake to set for at least 30 minutes before serving.
Notes